Showing posts with label DIY. Show all posts

Monday, September 21, 2015

DIY Chairs

Hi  What have you been up to lately?   I’ve been busy painting DIY chairs and finding fabric bargains to cover them.  The latest one is the two chairs at the ends of our dining room table.  Several years ago I covered them in  a check pattern I made with shirts from Goodwill.  They were beginning to get a little worn looking.  So when I found some red and blue toile regular $13 a yard for $4 a yard I couldn’t resist buying it.  I unscrewed the seats.
 And took off the fabric.  This is what I had before the blue.  I just used  scissors to cut the fabric bigger than the seat, then folded it over and used a staple gun to staple it.

 Here they are finished.  But they didn’t  look right in the dining room anymore, so  I wandered around the house looking for where I could put them and they ended up here in our front entry.  I really like them there, so what if you trip over them when you come in the front door? Just a minor inconvenience.


I got this fabric on sale too, reg. $29 a yard for $12, and I only needed 3/4 yard.  I am always picking up odd chairs here and there.  This was an orphan chair that I picked up by the side of the road.  I always seem to be doing DIY chairs projects.  Maybe I should be “the chair whisperer”.  Anyhow, there were 2 like this and one with arms.  Chalk paint from Walmart , staple the fabric to the seat, and another project is done.  Color is “Nautical”.  (I should have taken a close up photo so you can see the distressing.  I’ll do that another day).
 Remember I showed you these chairs that I painted with the Walmart chalk paint?  I decided they looked better at either end of the table than the blue ones I had before.  The blue orphans are in the middle.
Here is how the dining rom looks now.  Did I already tell you about the brass chandelier I got for only $15?  Out came the red spray paint and we have a new chandelier.  My new red color scheme is falling into place. To be continued…
Rhondi xo

Monday, August 31, 2015

Chalk Paint Chair DIY

So I am continuing to add some red to our living and dining rooms. Here is the next addition to the new red color story going on in our house. I bought a pair of these chairs about 15 years ago when we lived in Philadelphia.  They have just been collecting dust in our basement for the last few years.  They used to be black.

 I covered the black paint with Annie Sloan Chalk Paint pure white.
 Second coat was chalk paint from Walmart ($7.98).  The color is Imperial. If you’ve purchased chalk paint before you’ll know what a great deal that is!
 I did it very quickly, not worrying about getting a smooth even coat.
 Then I took some sandpaper and “distressed” it.  Distressing is just sanding off parts where it would have naturally worn off over time. I used 100 sandpaper which is a medium grit. If you don’t like this sloppy look , just make sure that your top coat of paint is even strokes.  
 The arms are a place that would get a lot of wear over the years, so I sanded there too.  Annie Sloan suggests using a coat of paste wax before you distress, but I think it distresses easier if you sand before you wax it.
 I sanded the legs and also the rugs and any other place I thought would get natural wear over the years.  The idea is to make the areas that you distress not look deliberate, but look like it happened naturally over time.  When I was finished I gave it a coat of paste wax. 
 The final step was to recover the chair seat.  Sorry I didn’t think to take any photos of how to do it.  Just google it, if you need some instructions. All you need is a staple gun, screwdriver to remove the seat, and fabric to cover it.
Right now the walls in our dining room are a pale yellow. The red chairs are going in there and I have a red chandelier that will replace the white one. I’m thinking of painting the top half of the walls navy blue. If I don’t like it, it’s only paint…  
I didn’t mention this to my husband yet.  I wonder what he’ll think when he reads this post!

Thanks for stopping by. Got time for a cup of tea?  I’ve got my red and white tea set all ready!


Rhondi xo

Wednesday, February 12, 2014

What to Do With Old Buttons: Make Button Heart

Here  in North Carolina people panic when there is a forecast of snow.  Yesterday when it started to snow I decided just to stay inside like a native Southerner.  I made some soup and some brownies and got some extra firewood ready to “ride out the storm” and I decided to do a little project.
Valentines Day is approaching.  I don’t decorate for Valentines day, but I love hearts, so this is sort of a Valentine’s Day post.
  I have always loved the shape of a heart.  I also like buttons and always buy some if I find them at garage sales.  I have lots of button ideas on my Pinterest pages and this idea for the button heart came from there.
 I had a photo in this lovely frame.  So I removed the glass and covered the cardboard back with some  pinstripe fabric that came from an old sheet.  I just taped it on the back.  Then I lightly painted the frame with Annie Sloan pure white, leaving some of the original color to show through
 I drew the shape of a heart on a piece of white paper and then hot glued the buttons on it.  When I finished I glued the heart to the pinstripe back.  There are so many online instructions for this  that I’m not going to give you a step by step tutorial.  You can google it :)
    Here is the finished button heart.  At first I was going to put it on the mantle in our living room.  It looked good there.
            But as I usually do when I have something new, I walked around the house trying it in different places.
I decided I liked it best on the desk beside my bed, next to the little cherub which was already there.  As I am writing this, I just realized that without even thinking I just made a Valentines Day vignette: hearts and cherubs!
    I am always on the lookout for heart shape stones and I put the few I have in a dish in front of the heart.
                     Here is a close up.  if you ever see a heart shaped stone and don’t want it, send it to me :)
My daughter and I have done several button initials as gifts.   They are so easy once you get the hang of it and are great for personalized  baby shower gifts, or a gift for the bride.  She did for me one Christmas and I have it hanging on my gallery wall in the TV room.
 Speaking of the TV rom, do you remember the button heart garland I showed you that was on the winter mantle in our TV room?   Now  that I had my  little button heart in the bedroom, I decided to bring it in there.
 I randomly draped it over the plates on the wall. I think every room in our house has plates on the wall :)  Maybe it looks a little corny but I like it for now.  It adds some whimsy to the room.
Because it’s white, my button heart isn’t just for Valentines Day.  It can stay around all year.  And we all need LOVE all year long, not just at Valentines Day.
**As I have been writing this post, it has started to snow again and they say so we are in for a bad storm again.  Good thing I’ve got some bread ready to put in the oven and some homemade soup for lunch.
Rhondi xo
Joining the parties at

Friday, December 7, 2012

Paper Christmas Tree


Today I am joining in  The Nester's Christmas Craft Party and continuing with  my no cost decorating theme.  Today's project is a paper Christmas tree. It's not really no cost, but only three dollars. I don't know about you but I get excited by the challenge of making something for little or no money.
Lately I've been inspired by some of the things I've seen on Pinterest that are made with pages of old books.  The first project I did was this wreath.  Once I figured out how to make the cones a uniform size, the rest was easy.  I'm not going to show you how to make it since because there are plenty of instructions online already.
In keeping with the theme of no cost decorating, the  letters for JOY are cut from a cardboard box and the O is an extra plate.  I have LOTS of extra plates!
 The wreath was fun and easy to make so I decided to try and make a paper Christmas tree.  Supplies needed:  tape , 5 or 6 poster boards ( not sure if that's the right name, it's what you use to make  posters), a glue gun and a couple of books.  Try to find  books that are the same size and the paper is similar in thickness and color.
First step was to  tape some poster board paper together into a cone shape.  Then tear the cover and spine off the books and tear the pages out.  Roll each page into a cone shape and glue the end so it won't unroll.
 Then begin to glue the paper cones around the shape doing one row at a time.
 Here is the finished paper Christmas tree.  It is about 4 feet tall.  I am very happy with how it turned out!  I wonder if anyone else has a tree like mine?

No where to put it?  First I tried it  on the left side of the couch, but the whole wall looked  lopsided.  I think that's because I  still need to put something to fill up the wall space beside the wreath. Actually I'm not happy with how that wall looks at all, but for now that's the way it is.
 So  I moved it to the other side and I think it looks better there, at least for now.

Here is a view of it through the mirror on the opposite wall.   You can see the mantle with the fabric scrap wreath I posted about a few days ago.

The nice thing about my Christmas crafts is that they aren't very "Christmasy" so I can leave them up after Christmas if I want to.
There are lots of bloggers joining The Nester's party so make sure you check it out  and happy crafting!
See you next time,
Rhondi xo

Wednesday, December 5, 2012

DIY Fabric Wreath 2


Yesterday I told you to come back and see where I put my fabric scrap wreath.  I wandered around the house for awhile looking for a place to hang it and this is what I finally came up with.  I took the mirror off the wall in the dining room and just leaned it up against the wall over the mantle  in our TV room.  I hung it a bit off center. It 's  kind of hard to take a photo of a mirror without  getting yourself in the picture!
            I also borrowed some blue and white china from the dining room and added my BELIEVE sign.
                        A group of thrift shop candlesticks and two little Christmas trees and it's  done.
                                        I tied a few fabric scraps on the trees which I think looks nice.

                       Now all we need is a crackling fire as we sit back and enjoy a hot cup of tea and chat.

There are lots of  parties happening in blogland this week. I'm  joining in a Christmas Wreath party at On Sutton Place and a Christmas mantle party at The Lettered Cottage and a Christmas vignette party at Southern Hospitality. Visit them for  more  inspiring ideas for Christmas decorating.
I am working on another  no cost DIY project which is fun so come back and see me again soon.
Rhondi xo

Monday, December 3, 2012

Fabric Scrap Wreath 1


Do you get lost on Pinterest?  There are so many beautiful and creative things to look at aren't there? I am fascinated by all the different kinds of wreaths there are and thought it would be fun to make  a wreath from fabric scraps.  I am a quilter so I have lots of fabric scraps.
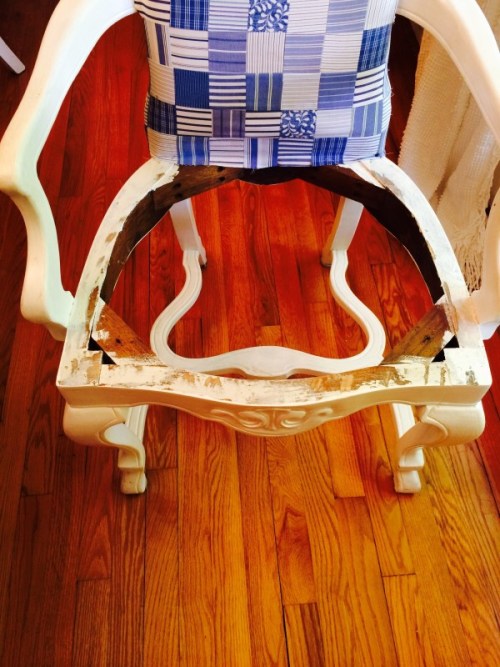
A few years ago I bought some men's shirts at Goodwill to make a quilt.  The fabric in men's dress shirts is very good quality and soft.  Anyway, I decided  to make a great quilt I found in a Kaffe Fasset book  using the shirts I bought.  The quilt was half finished when I abandoned that project ( do you ever do that?) because I thought it would be perfect  to cover a thrift shop bench instead.  There was lots left over so I sewed some of  it into patchwork and covered 2 dining room chairs.
When I made this wreath I used more of the leftover scraps.  All I had to buy was a $3 wire wreath from Michael's.  It was very easy, just  cut up strips of fabric and tie it on the wreath frame.  It took  AWHILE  to tie all the strips!   My husband likes to watch football or NASCAR on Sunday afternoons.  Not being a football or race fan I am usually doing something else in another part of the house, but today instead I worked on my little project in the TV room while he watched the games so we spent the whole afternoon together ( sort of).

I'm not going to show you how I made this wreath because there are already so many  tutorials on the internet. Besides I forgot to take any pictures of the process along the way!
Now that I've finished it I can't decide where to put it.   Comeback tomorrow and hopefully I'll have found a place.
Rhondi xo

Thursday, November 29, 2012

DIY Sweater Pillow


This is a  repost of a project I did recently: how to make a DIY sweater pillow from a sweater I found at a thrift shop.  But before I begin let me explain. I have been  so indecisive the last few months and have announced that I've started a new blog and then I've changed my mind (twice!) And some of you have been kind enough to follow me
At last I have come to the conclusion to keep my old blog name  Rose Colored Glasses and just transfer it over to Wordpress.  So here I am. In the move some of you may have lost track of me, but I hope that by now you have found me again and I promise not to move anymore :)
Please sit down and have a cup of tea with me and I'll show you what I did.  The inspiration came from a knitted pillow with a cable design on the front, that I saw in the Pottery Barn catalogue. It looked like it could have been a sweater, which gave me an idea. So I went to my favorite GW (Goodwill Store) to look for a sweater and found this blue one with a cable design on the front.

 It looked about the right size to cover a 14″ pillow form. First I washed it. Then I turned it inside out and used my sewing machine to sew a straight line from armpit to armpit.
 Next I cut off the excess and turned it right side out again. Then I put the pillow form inside. At one end was the seam I’d just sewn and at the open end was the ribbing which was at the bottom of the sweater.
I folded the ribbing over to the back and pinned it. This photo shows the back of the pillow. The cable design was only on the front.
 The next thing I did was unravel some of the wool from the parts of the sweater that I’d cut off and I used it as thread to sew where I just pinned. It’s best to use a needle with a big eye, so you can thread the thick wool through it.
                                                                  The finished seam looks like this.

                                           And here is the finished pillow on our couch in the TV room.
 My recycled sweater cost $3.79. That was the total cost because I already had an old pillow form which I recycled. A very stylish pillow in the color of my choice for a very low cost!
So how much do you think the Pottery Barn pillow was? It was $49.50 in a choice of only 3 colors and you have to provide your own pillow form!
My pillow turned out so well I just had to make another one. This time I went shopping at Salvation Army.
As luck would have it I found another one that is a perfect color.

                                     Here they are on the couch. Looks warm and inviting doesn’t it?


Cashmere would be so soft.  A  men’s sweater size could make a nice big one.  I can picture a whole bunch of multicolored sweaters or all white ones covering a couch.
Do you think you could make one?  Send me a picture if you make one and I’ll post it.
** Since I first wrote this post I have been looking for more sweaters.  They are harder to find than I thought.  I haven't found another suitable one yet!!
Glad you stopped by today!

Rhondi xo